

In this guide, I am going to give you a detailed example of a micro-niche blog that I created and now it is earning $200 from AdSense for me every month and besides affiliate marketing on average is making $100 every month. It took me only a few hours to do all this.
This is the blueprint to create a micro-niche blog, and you can use it for any topic or niche of your choice. I chose a niche that I like to read and write about. However, if you are not good at writing, you can hire writers from sites like Contentmart.
In the last year itself, this blog has made more than $ 2,000 for me and for this work I just had to spend 40-50 hours.
Why start a Micro niche blog?
First of all, after many changes in Google’s algorithms, niche websites now rank quite well in search engines.
If you create a high quality website on any particular topic, then the chances of your site being ranked in place of any other authority website are very high.
With this, you do not have to worry day and night to keep your blog evergreen.
Once you do all the hard work to create your niche site, the next step is to wait for the money to enter your bank account.
So let me give you the blueprint of my micro-niche blog which I have created.
Remember: This is the exact method that I have followed and you too can follow this blueprint to create a successful micro-niche blog.
Complete guide to creating a Niche Website that will make money for you.
Select Niche and Domain:
The most important thing that you will have to do is to find the best niche for your website in which you are comfortable.
Also know the potential of your niche, how popular and profitable it is commercially.
Just like our blog aims to make money with AdSense, it is very important that you U.K. Target the traffic of countries like that because there is high commercial value here, that is, by doing this you get high CPC.
In my case, I chose a topic called, Cydia which is a jailbreaking tool for iOS devices and is very popular among iPhone users. I chose this topic because I was quite comfortable with this subject matter and the time for this topic to expire was also too much. Apart from this, its search rate in Google was also very high.
To discover things like CPC, Google search rate, popularity, and competition, I used a tool called Long Tail Pro.
For Keyword Research, I used SEMRush. I like SEMRush very much because you just have to put a link of number one site in that niche in it and it tells you about all the keywords for which that site is ranking.
Along with this, SEMRush also helps us to do a complete SEO audit of any site and also contributes in some other things so that bloggers and webmasters can gain maximum organic traffic. (By using this special promo link, you can use SEMRush for 14 days for free!)
The next step is to obtain a niche domain name. So, as it is a micro niche site, I suggest you use the keyword in the domain name. Make sure it doesn’t look like spam and try to add some flavor using words like “Guide”, “Users”.
I chose the name of my site super310.in.
Keyword Research and Content planning:
This is the most interesting part and also requires a little time. But in the long run, you get many benefits.
I recommend you to use a Google Docs spreadsheet to keep track of your research so that everything is organized in an organized way.
For content planning, I was clear about some things I had to do:
- Choose such topics which will be in demand for a long time.
- Design a micro niche site like Wikipedia.
- Choose keywords that derive traffic and whose CPC is high.
Instead of just choosing high CPC AdSense keywords, I created a mindmap of the content, which was more like a FAQ.
for example:
- What is [Topic]?
- [Topic] How to use / install?
- What are the Advantages and Disadvantages of using this [Topic]?
- Important facts about this [Topic]
These were some ideas that I thought about before doing detailed keyword research.
After that I used SEMRush to find keywords.
After this, I chose some blogs related to my topic and as I said earlier, then I put them in SEMRush and search for such keywords from which blogs were getting traffic.
Then I spent some time writing 4-5 blog posts and then wrote a post daily for the next few days. And within 15 days I had 15 high quality evergreen articles and my content was ready to move forward. (The expiry date of Evergreen posts is at least 2-3 years and such posts remain relevant for at least two or three years.
As I said earlier, if you are not good at writing, it is no harm to hire another person for this job. It takes a lot of work to manage any blog and it is important that you also have good content to manage.
Setting up Micro Niche Blog:
This part of the setup was very easy for me. If you know how to create a WordPress blog, then this step will be very easy for you. Apart from this, your content will be the main attraction.
Below, I have given a list of exact tools that I used to build my micro-niche site:
Plugins:
- Yoast SEO: For SEO (How to use WordPress Yoast SEO plugin for On-Page SEO?)
- Comment Akismet to Prevent Spamming
- Auto Post Thumbnail for the generation of automatic features images
- SocialWarfare for Social Bookmarking Icons
- Jetpack by WordPress for different multiple tasks (full review of Jetpack WordPress Plugin: make your blog more feature-rich)
- No Self Pings to Prevent Self-Pinging
- PushPress for Faster Indexing
- SEO Friendly Images for Image-Level SEO
- WP Super Cache for Caching. There is also an alternative, W3 Total Cache.
A few more steps that I followed:
- Blog made SEO perfect
- Special care was taken for content quality and keyword score.
- Made some videos on YouTube and gave a link to his site’s posts in his description. It also helped me create backlinks.
- Submitted your site’s sitemap to Major Search Engines. (Google, Bing, Yahoo, etc.)
- Using Free Online Logo Maker, created the logo.
- Set up Google AMP.
- Setup Facebook Instant Articles
Some great steps to follow at Optional:
- Add Contact Page and About Page
- Use Push Notifications to get Return Traffic
- Start building an email list. (You can take advantage of this later through email marketing)
The whole idea of this blog was not to do too much work and to earn money from it. For this reason, I did not spend much time for branding it. Its goal was to get more traffic from search engine, provide solutions and make money from micro niche blog.
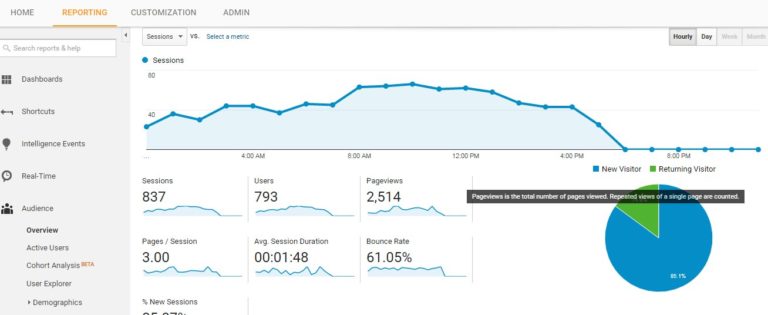
And here is his traffic report:
Remember, there are only 29 blog posts on this blog and this blog has not been updated for a long time. Now I need to push it to get more traffic on it.
Monetization
For the first few months, I only used AdSense and then I also added an Affiliate product related to the iPhone niche which also generated extra income of $ 50 per month for me.
However, if you do not get AdSense approval, you can use AdsOptimal and Media.net. Both of these will work well if your traffic is from the U.S.A or Europe.


Nice way and very easy language to understand.
Yo! was searching for proper micro niche blog article and found yours ,
it is reallt informative.
Btw check out my blog would love to have you over and will be thankful for your opinions
top4charts.blogspot.com