
Do you want to create a blog in WordPress?
This is a complete beginner’s guide to help you get started on your blog and check the section below to learn how to use WordPress as well.
All this information is free and you feel free to act and start creating something new.
This is what we will cover – you can click to go directly to a specific section:
- Sign up with Bluehost
- Install WordPress on Bluehost
- Set up your WordPress website
Let us begin…
How to register with Bluehost:
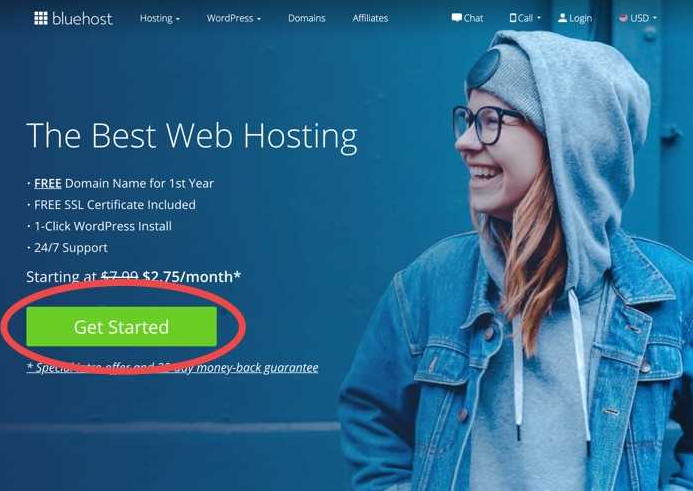
Here’s how to get your Bluehost account up and running …
1. Choose a hosting plan:
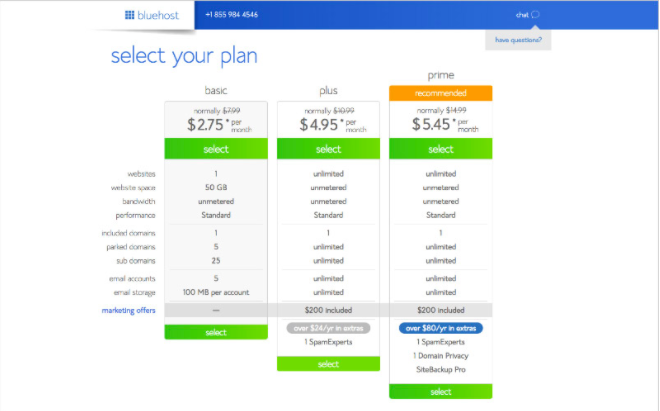
The first step is to select a hosting plan that meets your needs. Bluehost offers a variety of hosting options including …
- Shared hosting
- WordPress hosting
- VPS hosting
- Dedicated hosting
If you’re not sure which plan is best for you, we recommend starting with the budget shared hosting plan, which starts at just $ 2.95 per month.
Here’s more reading to help you choose the right hosting plan for your project …
2. Create a new domain name:
With all Bluehost plans, you get a free domain name for the first year.
Once you’ve selected your hosting plan, select Create a new domain to choose your free domain name.
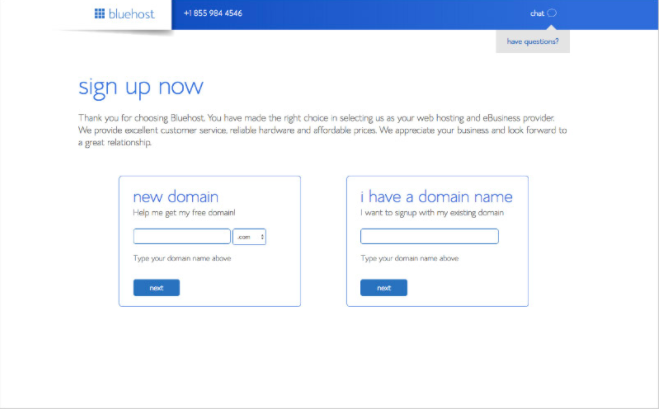
Enter your chosen domain name in the domain search and Bluehost will display a list of available domain extensions or similar available domain names.
If you need help choosing the right domain name for your new website, check out these articles …
3. Enter your Bluehost account details:
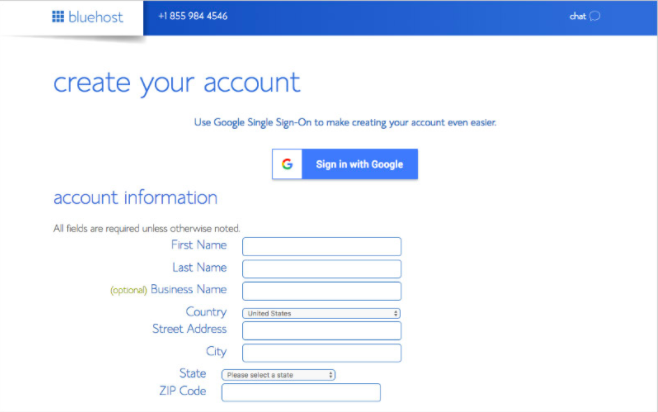
Next, Bluehost will ask you to fill in some personal information to create your account. Or you can log in with Google to speed up this process.
4. Confirm the details of the hosting plan:
Bluehost will now display your plan details. Check them out carefully, as by default Bluehost adds several premium “extras”. These include…
- Domain privacy protection (from $ 11.88 per year)
- SiteLock Security (from $ 23.88 per year)
- CodeGuard Basic (from $ 2.99 per month)
- Bluehost SEO Tools (from $ 23.88 a year)
Unless you already know that you need a certain service, we recommend that you deselect all of these plugins. None of them are essential and you can always add them later if needed:
In Account Plan, you can also set the number of years for which you want to register with Bluehost. The minimum commitment is 12 months, but you can get a bigger discount if you commit to several years in advance.
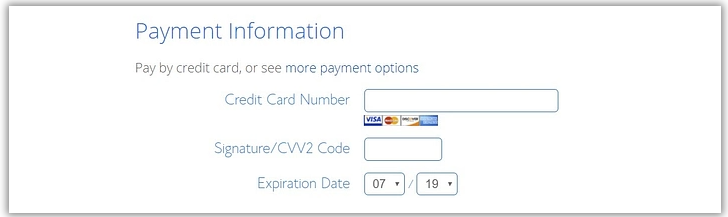
5. Enter your payment details:
The last step in the Bluehost registration process is to enter your payment details and confirm the order.
Remember, Bluehost offers a 30-day money-back guarantee, so if you are not satisfied with your plan or the hosting service after purchase, you can request a refund.
Bluehost will now go ahead and set up your new hosting plan and domain name. You will then receive an email with the payment confirmation, as well as your new account information, including login and password details.
How to install WordPress on Bluehost:
Once you have purchased your hosting plan, you must then install WordPress on Bluehost. Again, this is a relatively quick and easy process, aided by Bluehost’s user-friendly interface and its one-click WordPress install feature.
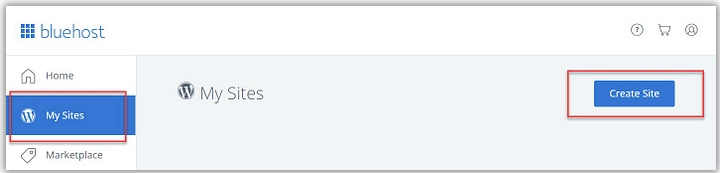
1. Login to Bluehost:
To get started:
- Log into your new Bluehost account.
- Go to the My Sites tab.
- Click the Create Site button in the upper right corner.
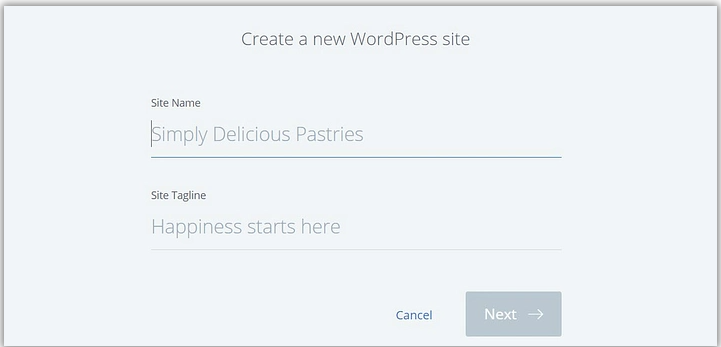
2. Enter your website information:
Next, you need to enter basic information about your website, including the name of the site and the motto of the site. Don’t stress too much, you can always change them later:
3. Choose your domain name:
Use the Domain drop-down menu to select the domain name you chose when you created your Bluehost account.
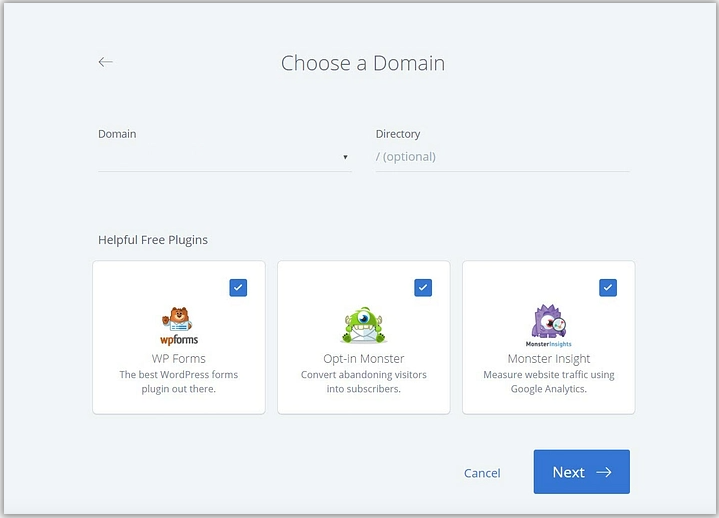
You can also choose whether or not you want to install some of the Bluehost recommended plugins.
4. Click "Next" to install WordPress on Bluehost:
Bluehost will now install WordPress for you, creating your new WordPress website and displaying your login details.

To open your new WordPress website, click the Sign in to WordPress link.
How To Set Up Your New WordPress Website With Bluehost Tools:
First, we must keep in mind that you do not need to follow the steps in this section. It is entirely possible to create your own website using the normal WordPress dashboard.
However, if you’re not sure where to start, Bluehost provides its own dashboard in the Bluehost area of your WordPress dashboard that can help you get your site up and running.
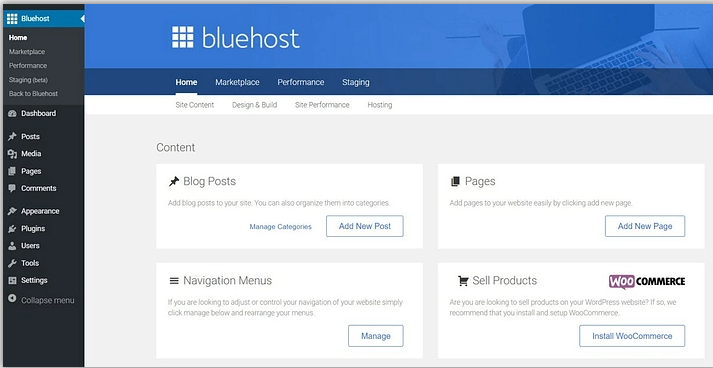
In the Bluehost area, you can …
- Add new pages and posts
- Manage your menus
- Create an ecommerce store with WooCommerce
- Create a test environment to test your website
- Deactivate the “Coming Soon” page of Bluehost and start your website
Most of these are basic WordPress functions, just put together in one convenient place for you to access.
The Bluehost dashboard is a particularly useful tool for those who are new to WordPress and who may need some guidance on how to get started. Here’s how to use it …
Complete manual WordPress installation tutorial:
So I guess we’re all ready to move on. From here, we can take 2-3 different steps to go ahead with the manual WordPress installation.
You can either extract the .zip file directly and edit the wp-config file as shown below and upload the entire WordPress folder to your domain root (Public_html), or you can use the cPanel file manager to extract and edit the content of the wp-config.
Anyway, the only step we need here is to change the contents of wp-config and upload it to the correct folder on your FTP. You can use a free FTP client like FileZilla to do this.
But to keep this tutorial simple, I’ll be using cPanel for web hosting.
Uploading WordPress to your cPanel:
Now under your cPanel go to the file manager and upload the WordPress zip file that you have downloaded. Once you have uploaded the WordPress.zip file, click extract and extract everything to the public_html directory. (Note: it should be the first WordPress installation on your cPanel).
If it is an addon domain, extract the files in the directory you provided to add the domain. Usually public_html / addon-domain name.
To simplify this step, I am extracting everything in the public_html directory.
In your cPanel hosting, you can go to Files> File Manager, find the public_html directory, and upload the WordPress.zip file.
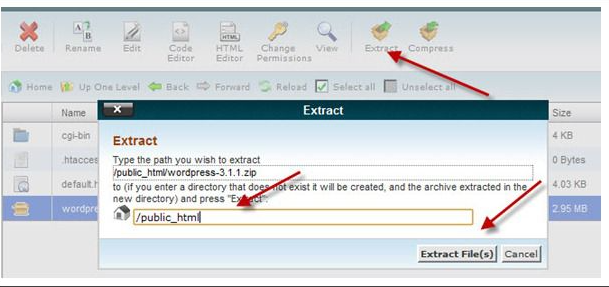
Usually the file extractor will create a directory name “WordPress” and extract all the files under it.
Since we are installing on the main domain, (www.domain.com) and not (www.domain.com/WordPress), we will move all files directly under the / public_html director using the move command.
Go to / public_html / WordPress using file manager again, select all files and click move at the top, and move all files to public_html.
Editing the WordPress wp-config file:
Now the next step is to fill in the database information in the wp-config. You can make a copy of wp-config-sample.php and rename it to wp-config.php. Now, select wp-config.php and click edit:
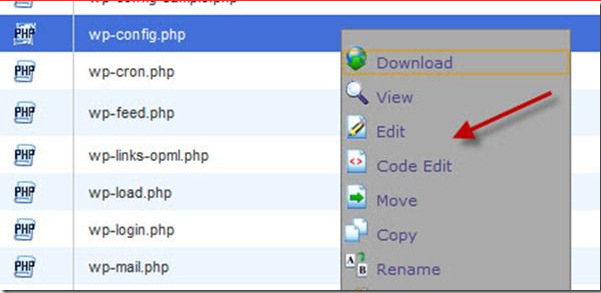
In this file, here are a couple of things you need to change:
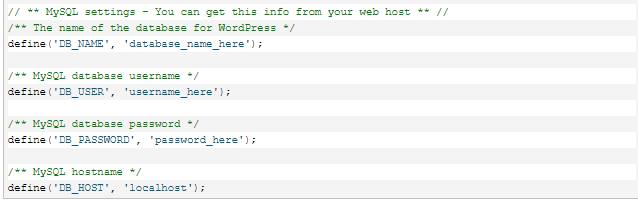
Now, replace database_name_here, username_here, password_here with the details we created in step 1.
Db_host is generally still Localhost on most shared hosts like Bluehost, Dreamhost, and HostGator. Once you’ve added those details, click save changes.